Thanks for visiting!


We have been serving the Mustang Hobby for over 40 years by providing quality parts with great service and reasonable prices. Check out our web site.

We started this Blog to share pictures, show new parts, and just talk about 64 1/2-73 Mustangs. We love to feature Customer Cars also. If you would like to see your Classic Mustang right here on our Blog, send us an email by clicking here to find out how!!

Feb 27, 2013

65-67 Mustang Lower Shift Lever Bracket - Price Drop!!

65-67 Mustang 3 and 4 Speed Shifter Lever U-Bracket.
www.VirginiaClassicMustang.com
The price on our Lower U-Shaped Shifter Bracket has dropped from $54.95 to $42.95!  This bracket fits on all 65-67 Mustang 3 and 4 Speed Shift Levers.  It is the bracket that holds the shift lever to the shifter assembly.  It is often broken.  Our part number is IN-578.

Don't forget that we also have the mounting bolts and the shift lever rebuild kits.

Mustang 3 and 4 Speed Shifter Lever Mounting Bolts with Washers.
www.VirginiaClassicMustang.com


Feb 25, 2013

65-66 Mustang White Kick Panels

Exact Style 65-66 Mustang White Kick Panels
www.VirginiaClassicMustang.com
Our black exact reproduction kick panels for the Mustangs have been extremely popular and a great improvement over the cheaper reproductions.

We are now proud to announce that this same kick panel is now available in the correct color white for the 65-66 Mustang Fastbacks and Coupes.  We expect the convertible models very soon.

These new kick panels feature the correct texture, proper contours, reinforced screw holes, and correct grain.  These are made by Scott Drake, just like the black ones.  

Another great feature is the gap or lip where these kick panels fit to the pinch weld and windlace.  Check out the picture below, and you will see how this "gap" is wider than the cheaper reproduction for a great fit.

Exact Style 65-66 Mustang White Kick Panels.  The proper holes are molded in the kick panel with the reinforced back, just like the original.
www.VirginiaClassicMustang.com

Exact Style 65-66 Mustang White Kick Panels.  The lip on the front of the kick panel is the width of the original, so the fit is much nicer than the cheaper reproduction.
www.VirginiaClassicMustang.com

Exact Style 65-66 Mustang White Kick Panels.  The shape and contour is exactly like the original.
www.VirginiaClassicMustang.com


Feb 22, 2013

Just the Details...1965 Mustang Convertible Restoration

The 65 Mustang Convertible is coming along quite nicely!
www.VirginiaClassicMustang.com
 Hopefully you have been following our Blog posts about Maple Hill Restoration's (www.MapleHillResto.com) 1965 Mustang Convertible.  It is just looking better every day.  This is the part of the restoration process that is fun.  Things just start looking good and coming together quite nicely.

The instrument panel / dash, rear end area, chrome, etc...it all looks so nice!  That Twilight Turquoise is a great color, and wait until the white interior goes in.  This is a beautiful Mustang!

We hope you enjoy these latest pictures.

The Mustang's well liner is in place.
www.VirginiaClassicMustang.com

Wow!  The dash in the Mustang looks great!
www.VirginiaClassicMustang.com

The Rally Pac was an option on the Mustangs...even the six cylinder cars!
www.VirginiaClassicMustang.com

Factory AM Radio is installed.
www.VirginiaClassicMustang.com

The interior of the Mustang is painted.  It will be white with black appointments.
www.VirginiaClassicMustang.com

That Twilight Turquoise paint looks great even in the door jamb area of the Mustang.
www.VirginiaClassicMustang.com

This is the area behind the interior quarter panel.  The detail is incredible.  The correct color  red sealer has even been applied to this area that won't be seen after the interior is installed.
www.VirginiaClassicMustang.com

The Mustang's gas tank is installed and the trunk area is almost completed.
www.VirginiaClassicMustang.com

Tail light detail on the Mustang convertible.  Beautiful!
www.VirginiaClassicMustang.com

That great looking, date stamped rear license light assembly that we featured in an earlier blog post is now installed.
www.VirginiaClassicMustang.com

The Mustang rear bumper guard fit and finish looks great!
www.VirginiaClassicMustang.com

Here is the detailed six cylinder rear end that has been installed.
www.VirginiaClassicMustang.com

The Mustang dash looks great!
www.VirginiaClassicMustang.com


Feb 20, 2013

New! Correct Hardware for 1965 Mustang Motor Mounts


We now have the hardware kit to mount the '65 Mustang Cast Iron Motor Mount Brackets to the Frame/Shock Tower.  As shown, this kit includes 6 correct flange bolts and 6 correct flange style lock nuts.  The bolts are phosphate coated like the originals, the nuts are properly zinc plated.

Our part number on this new item is PE-611.


Feb 18, 2013

New Part! 1967 Mustang Brushed Aluminum Insert

1967 Mustang Brushed Aluminum Insert for the RH Heater Control Panel.
www.VirginiaClassicMustang.com
We now have real brushed aluminum insert panels for the '67 Mustang RH heater control panels.  Our part number is IN-1571.

Now you can either cover your existing heater panel or our new IN-5617 '67 Mustang Heater Control Panel with this insert for a complete brushed aluminum look.

This goes great with our IN-157 Brushed Aluminum Panel set and our IN-152 1967 Mustang Instrument Bezel with the real brushed aluminum insert.

1967 Mustang Brushed Aluminum Instrument Bezel.
www.VirginiaClassicMustang.com

1967 Mustang Brushed Aluminum Dash Trim Panel Set.
www.VirginiaClassicMustang.com
Also note that our IN-152 '67 Brushed Aluminum Instrument Bezel now has a new low price of $119.95!!!

Feb 13, 2013

Just the Details...1965 Mustang Restoration

The Mustang's rear end assembly is detailed and ready to be rolled under the car.
www.VirginiaClassicMustang.com

Jeremy at Maple Hill Restoration (www.MapleHillResto.com) has been assembling his 1965 Twilight Turquoise Mustang Convertible and is really making progress.  This is a cool 6 cylinder Mustang convertible with the rare Dagenham 4 speed transmission.  In this post, we will share some pictures as the rear end assembly and some of the pieces on the back of the Mustang goes together.

Boy, is it looking good!!  Check out the captions on the photos for more details.

The Mustang's rear end assembly is detailed and ready to be rolled under the car.
www.VirginiaClassicMustang.com

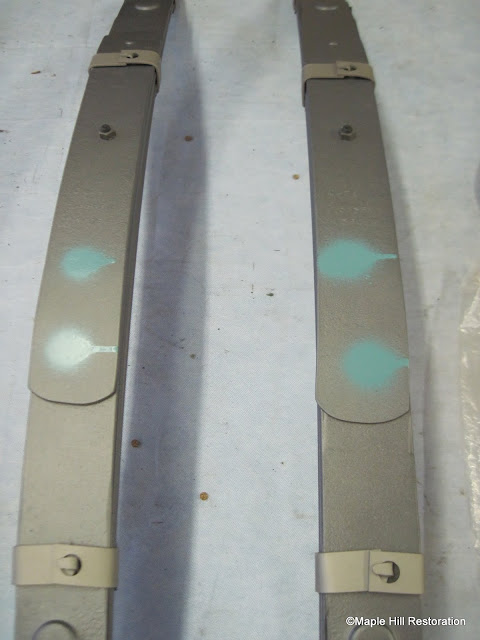
The Mustang's rear leaf springs have been detailed by matching the markings that were originally found during disassembly.  The light blue paint markings are apparently unique to the 6 cylinder (and, maybe, convertible).
www.VirginiaClassicMustang.com

The leaf springs have a engineering part number of C4ZA 5556N.  This is a designation for the 6 cylinder Mustang Convertible.  The "360" represents to 360th day of the year.  The "E" may have been the manufacturer code, and the "4" is 1964.
www.VirginiaClassicMustang.com

Original flat style top rear end u bolts for the Mustang's rear end and leaf springs.
www.VirginiaClassicMustang.com

The original paint markings were duplicated on the Mustang rear shock mounting plate.
www.VirginiaClassicMustang.com


The rear end assembly mounted in the Mustang.
www.VirginiaClassicMustang.com

Note the little plastic tab on the frame rail.  This was originally a looped plastic strap that was installed here during the Mustang's assembly to hold up the rear parking brake cable.  It was cut off like this once everything was installed in the Mustang.
www.VirginiaClassicMustang.com

The Mustang's original rear tie down plate was re-installed.
www.VirginiaClassicMustang.com

More detail on the Mustang leaf spring and rear end.
www.VirginiaClassicMustang.com

More detail on the Mustang leaf spring and rear end.
www.VirginiaClassicMustang.com

Trunk board installed.  The bare area around the trunk floor has been duplicated.  This is the area where the Mustang was bolted down to the assembly line and painted while bolted down.
www.VirginiaClassicMustang.com

The original rear license plate light has been disassembled, re-plated, and re-assembled for the Mustang.
www.VirginiaClassicMustang.com

The Mustang's original rear license plate light is stamped "4K" which represents October 1964.
www.VirginiaClassicMustang.com

The Mustang rear bumper bracket.  It's cool to note that the nuts were originally plated zinc as shown here. ..just another incredible detail.
www.VirginiaClassicMustang.com

The Mustang's rear end is looking great!
www.VirginiaClassicMustang.com

The Mustang Convertible is rolling!...at least in the rear.
www.VirginiaClassicMustang.com


Feb 11, 2013

New! Big Block Ford Thermostat Housing

In addition to our EG-1771 Big Block Ford Thermostat Housing, we now have this new Thermostat Housing for your Mustang (or any Big Block Ford) without the threaded port for any emissions equipment.

This is our part number EG-1770.  It's a great alternative if you are running a "clean" set up without the factory emissions equipment.  It will fit any 67-70 Big Block.

Like our other Mustang thermostat housings, this is a quality piece made from pressure die cast aluminum.


Feb 8, 2013

New! Ford Mustang Running Horse Logo T-Shirt

Ford Mustang Running Horse Logo "distressed look" T-Shirt.
www.VirginiaClassicMustang.com
Here is another cool T-Shirt design that just arrived!  It's a very nice 100% cotton charcoal colored shirt and features a distressed look, classic, tri-bar running horse logo.  It's available in medium, large and extra large sizes.

Our part number is AC-234.

Feb 6, 2013

Another New Part! 1965-70 Mustang Coupe Rear Package Tray Retainers

1965-70 Coupe Rear Package Tray Retainer Set with clips
www.VirginiaClassicMustang.com
We just got these in!  It's a neat little part that is certainly difficult to find.  These fit on the front edge of the coupe rear package on the 65-70 Mustangs.  The set includes two metal retainers and the installation clips as pictured.  Order part number ST-1711.

1965-70 Coupe Rear Package Tray Retainer Set with clips
www.VirginiaClassicMustang.com


Feb 4, 2013

New Parts! Complete Mustang Convertible Rear Wheel House Assemblies

Mustang Convertible Complete Wheel House Assembly


We now have complete rear wheel house assemblies for both the 65-66 and 67-68 Mustang convertibles.  This complete unit consists of the inner and outer rear wheel house pieces.  The convertible models are unique in that they have a flattened area on the top of the inner wheel house.  This flattened area is needed for clearance for the folding convertible top when it is in the lowered position.

Our part numbers are as follows:

SM-9451L   65-66 Mustang Convertible LH Complete Rear Wheel House Assembly
SM-9451R   65-66 Mustang Convertible RH Complete Rear Wheel House Assembly

SM-9461L   67-68 Mustang Convertible LH Complete Rear Wheel House Assembly
SM-9461R   67-68 Mustang Convertible RH Complete Rear Wheel House Assembly

Mustang Convertible Complete Wheel House Assembly

Flattened area shown on the inner wheel house on a 1965 Mustang Convertible.  This area is flattened to allow clearance for the folding convertible top when it is in the down position.


Feb 1, 2013

65-68 Mustang Windshield Weatherstripping Installation

The surrounding areas on the Mustang are covered and taped to prevent the sealer from getting on those areas.  The windshield molding clips are also installed.
Over the years, one of the most common questions that we receive concerns the installation of a windshield in a 1965-68 Mustang.  Often it is thought that the Windshield Weatherstrip actually seals the glass and prevents any water leaks.  Well, it sort of does, but without the proper sealer and correct installation, it is going to leak.

Jeremy at Maple Hill Restoration (www.MapleHillResto.com) recently installed the windshield in his beautiful Twilight Turquoise '65 Mustang Convertible and supplied us with these great pictures along with his expertise   concerning the installation.

Jeremy also applies sealer around the windshield clip installation hole on the Mustang.  You will note that this is a '65 with the earlier style screw on type clip.

The view from the inside of the Mustang prepared for the windshield installation.

About three tubes of #8509 3M Bedding and Glazing Compound are used to seal the windshield weatherstrip.

One of the key elements needed in the Mustang windshield installation in about 3 tubes of 3M Bedding and Glazing Compound (#8509).  As you can see in the images, this is applied both between the glass and the weatherstrip, but also between the weatherstrip and the body.  This is what really seals the glass from water leaks, not the weatherstrip itself.

Windshield Weatherstrip placed on the Mustang windshield for installation with a string in the groove which will allow the weatherstrip lip to be "pulled" around the windshield frame.  This is done from the interior area of the Mustang.

Rope (String) installed in groove of weatherstrip.  This allows the weatherstrip lip edge to be "pulled" from the inside.

A rope is placed in the "groove" of the weatherstrip and then the weatherstrip is "pulled" in the Mustang.

A bead of sealer is applied around the Mustang windshield frame area.

Another image showing the sealer applied before installation.

The Mustang windshield is placed in the frame of the car, and Jeremy prepares to pull the rope.

As the rope is pulled the Mustang weatherstrip inside lip is pulled towards the inside over the metal edge.

As the rope is pulled the Mustang weatherstrip inside lip is pulled towards the inside over the metal edge.

As the rope is pulled the Mustang weatherstrip inside lip is pulled towards the inside over the metal edge.

As the rope is pulled the Mustang weatherstrip inside lip is pulled towards the inside over the metal edge.

As the rope is pulled the Mustang weatherstrip inside lip is pulled towards the inside over the metal edge.

As the rope is pulled the Mustang weatherstrip inside lip is pulled towards the inside over the metal edge.

As the rope is pulled the Mustang weatherstrip inside lip is pulled towards the inside over the metal edge.

This particular Mustang originally had a clear windshield with a December 1964 (4M) date.  The windshield shown here as an accurately reproduced Carlite logo with the proper markings.  These are available from various suppliers.

After installation, sealer is applied between the glass and the weatherstripping on the Mustang.
Even more sealer (3M Bedding and Glazing Compound) will be applied around the Mustang windshield before the molding is installed.  After the Mustang is fully assembled, it will be water tested, and if a leak is found, more sealer will have to be applied.

That sealer is messy.  Jeremy kind of makes it look easy. :)  If you've never done this, your "messiness" level may be a bit greater!

Excess sealer will be cleaned off.

Excess sealer will be cleaned off.

Applying sealer to the inside lip of the Mustang windshield weatherstrip.


Excess sealer will be cleaned off.

The Bedding and Glazing Compound Sealer is also applied between the Mustang windshield weatherstrip on the body (windshield frame).

The excess 3M Bedding and Glazing Compound Sealer is cleaned from the Mustang windshield weatherstripping.

The Mustang windshield installation is complete.

View of the Mustang windshield installation from the inside of the Mustang.